In this topic you will learn how to create and manage live events using the Video Cloud Live module.
The Live module can be used to help you broadcast a live event to both desktop and mobile devices. After entering your event information into the Live module, you will be provided with a set of encoder settings that you plug into your on-site encoder. All transcoding is done in the cloud so you don't need a hardware based transcoder.
Note: Live streaming support is available only for Video Cloud Pro and Enterprise publishers.
If you are looking to quickly get started broadcasting a live event, check out the Quick Start: Using the Live Module to Broadcast a Live Event topic. For a series of best practices and recommendations to help ensure a high quality, stable live streaming experience, see Live Module Guidelines and Best Practices. For a list of all the options available from Brightcove for delivering live streaming video, see Delivering Live Streams.
This topic is broken down into the following sections:
- Prerequisites
- Video Cloud Live module home page
- Working with planned events
- Creating a new event
- Editing an existing event
- Deleting an event
- Starting your live event
- Working with on air events
- Working with completed events
- Using multiple broadcasts per event
- Trimming and saving your live event
- Live event analytics
- Troubleshooting live stream issues
Prerequisites
Before you can broadcast an event, the following items are required:
- A Video Cloud Pro or Enterprise account with access to the Live module; you can sign up for a Live module trial here
- A camera to broadcast the event
- You must have your own encoding software, for example Adobe Flash Live Media Encoder (which can be downloaded for free) or Telestream's Wirecast (see a list of supported encoders)
Limitations
- Your encoder must output an RTMP stream
- Live broadcasts will experience a 20-30 second delay
- Maximum of 26 continuous event hours
- Streaming must begin within 30 minutes of the event start
- HD is defined as video with a height of 720 and up; SD is video with a height below 720
- Akamai HD must be used as the Content Delivery Network (CDN)
- For users using Internet Explorer, version 10 or later is required
Video Cloud Live module home page
To access the Live module, open Video Cloud Studio. You will be required to enter your Video Cloud credentials. After logging in, your Video Cloud account name will appear in the upper right corner of the page. If you have multiple accounts, use the account switcher dropdown to select the account you would like to work with. If the account you select hasn't been enabled for Live, the Live module will open in trial mode.
Note: For users using Internet Explorer, version 10 or later is required to access the Live module.
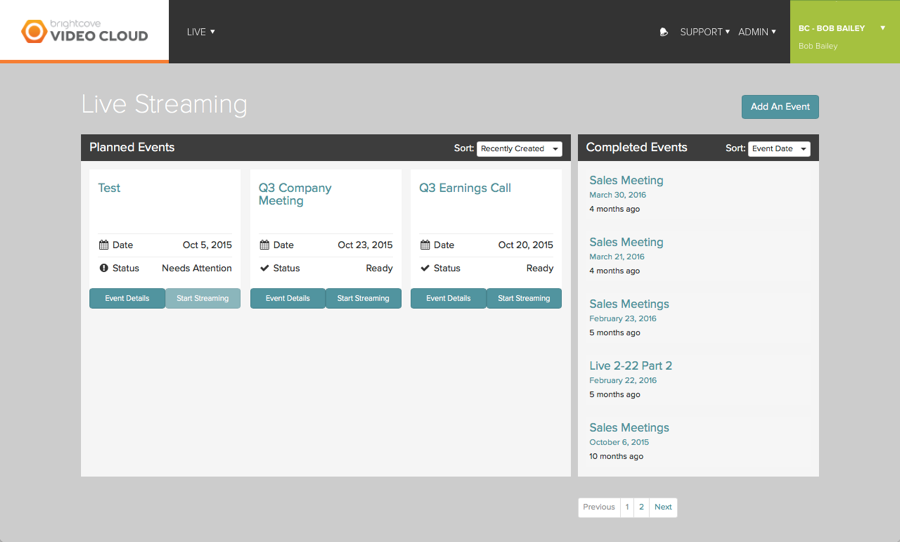
The Live module home page contains Planned Events and Completed Events sections.
Working with planned events
Planned events are events that have been created but where streaming has not started. The Sort drop down list can be used to sort the events by creation date, event date or name. Navigation at the bottom of the Planned Events section allows scrolling between different pages of events. Each event will display in a tile with the event date and status. A status of Ready indicates the event is ready for streaming. A status of Needs Attention indicates the event is incomplete and the Start Streaming button will be disabled. This is typically due to the output delivery options not being configured.
Click on an event name or the Event Details button to view the details for an event.
If an event is incomplete, the Start Streaming button will be disabled. This is typically due to the output delivery options not being configured. Click the Start Streaming button to start your event.
Creating a new event
To create a new event, follow these steps.
For a complete step-by-step guide to creating and streaming a live event using the Live App, see Quick Start: Using the Live Module to Broadcast a Live Event.
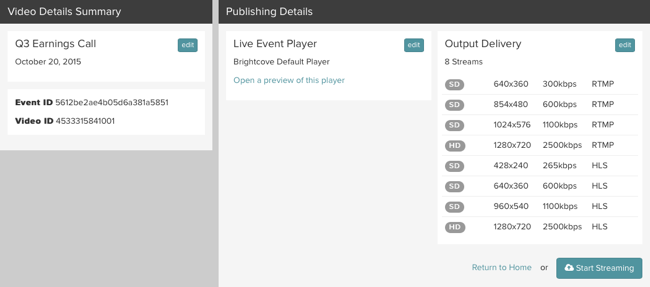
- Click the Add An Event button.
- Add details for your live event and click Save and Continue. Note that these values will be associated with the asset in Video Cloud Studio.
- Event Name - top level name for the event; this name is internal to the Live module
- Broadcast Name - name for the broadcast; Note: it is possible for an event to have multiple broadcasts but using multiple broadcasts is only recommended when using a Smart Player
- Short Description - description of the event
- Tags - tags to associate with the event
- Reference ID - reference ID associated with the event
- Event Date - planned date of the event; for informational purposes only and has no effect on the event
![]()
Note: The Advanced Settings can be used to set the reconnect time and event length for an event. The stream will be kept open for the remainder of the event length or the full reconnect time, whichever is greater, unless you click Stop Streaming in the Live Module.
- On the Select a Player dialog, select the player from the drop down list that you would like viewers to use to view your event. The list will display the single video players in your Video Cloud account. Both Brightcove Players and Smart Players are supported. Brightcove Players will have (New Brightcove Player) following the player name. Click Save and Continue.
![]()
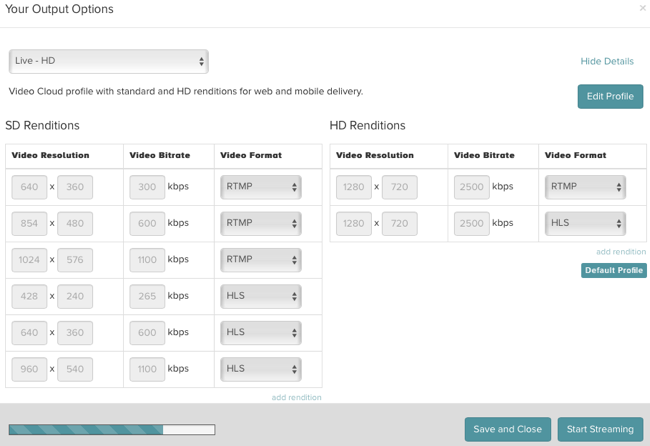
- The Your Output Options dialog allows you to select a predefined transcoding profile for the event. Each profile has a set of transcode settings associated with it.
Note: The transcoding profiles that appear are based upon your Live module subscription plan.
![]()
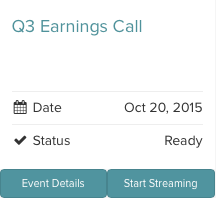
- After your event has been created, you can view the live event asset inside the Video Cloud Media module and generate the publishing code for the player that will be used to view your live stream.
Note: The live asset that is created inside of the Media module SHOULD NOT be deleted until the event has finished streaming. Deleting the live asset before the event has started streaming will cause errors inside of the Live module.


Click the View Details link to see the rendition details. If you are not sure of the rendition settings at this time, click the X button to close the dialog. Your event will be saved without rendition information and you will be required to select a transcoding profile before you can start your event. You can customize any of the output settings and create new transcoding profiles by clicking the Edit Profile button. To learn how to create additional transcoding profiles, see Creating Transcoding Profiles for the Live Module.
Note: By default, all of the Live module output profiles create RTMP renditions which are not supported by the Brightcove Player. If you are publishing your live event using a Brightcove Player, Brightcove recommends that you create a custom profile and either delete the RTMP renditions or change the RTMP renditions to HLS renditions.
When done, click the Save and Close button to save your event for streaming at a later time or the Start Streaming button to start your live event.
Editing an event
All live events created using the Live module can be edited. For example, you might want to change the player associated with an event or maybe you need to edit the renditions that will be created for an event. To edit an event, follow these steps.
- Click on the event name or the Event Details button to edit.
- Click the appropriate Edit button to edit either the video or publishing details.
- Click the Update button to save your changes.
Deleting an event
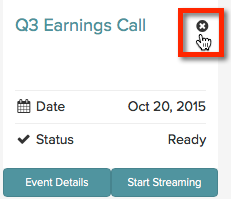
All events in the Planned Events and Completed Events sections can be deleted. To delete an event, follow these steps.
- Rollover the event you want to delete in either the Planned Events or Completed Events section and click the X to the right of the event name.
![]()
- Confirm the delete warning.
Starting your live event
There are two ways to being streaming your live event:
- After creating a new event, you can click on the Start Streaming button
- Click on the Start Streaming button in the Planned Events section
Note: Only events that have all required information (indicated by a status of Ready) can be started for streaming. If your event status is Needs Attention, edit the event and make sure all required information is provided.
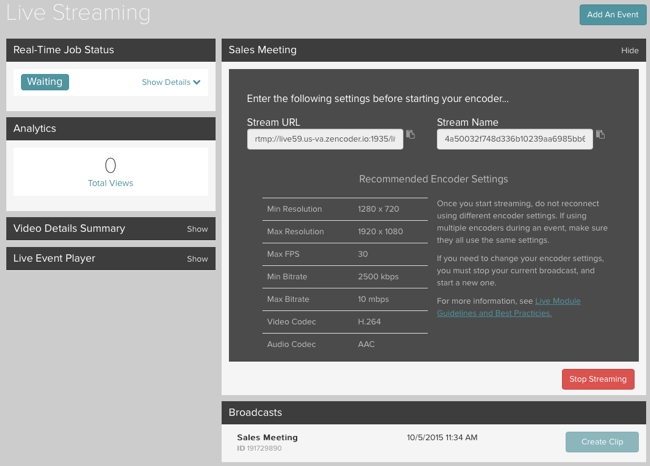
After you click the Start Streaming button, the Live module will return a Stream URL and Stream Name that you will use as part of your encoder configuration. Enter these values into your encoder, and start your encoder. In the Live Event Player section, you can choose to copy the URL or the embed code for the live event player.
For a list of supported encoders, see the Zencoder documentation.
Note: For the best quality, we recommend configuring your encoder to output a 1280 x 720, 2500 Kbps stream.
Working with on air events
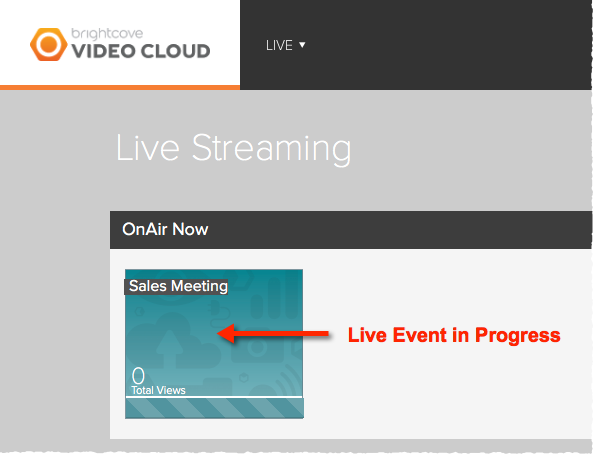
The Video Cloud Live module home page displays On Air events at the top of the page. On Air events are events where streaming is currently in progress.
All on air events can be edited. To edit an event, click on the event thumbnail. Click the Show link in either the Video Details Summary or the Live Event Player section to view the details. Click the Edit button to make changes. The page will also display a preview of the event. The dropdown list below the preview window can be used to select a rendition to preview.
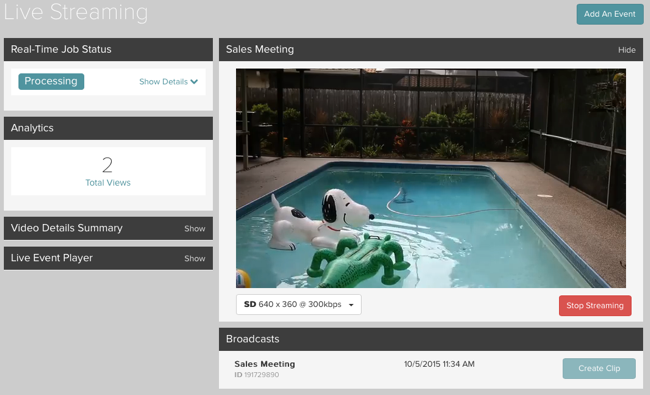
Note: You can click the Hide link in the preview window to hide the live event player. This helps reduce bandwidth and CPU usage when you are streaming and encoding on the same machine.
Click the Stop Streaming button to end your event. When you have stopped streaming your event, you can trim and save the live event to your Video Cloud account.
Note: It is important to make sure you close/stop your encoder when the live stream is complete. Leaving a connection open between any encoder and Brightcove, even when no data is being sent, may result in unexpected connection charges.
Working with completed events
The Video Cloud Live module home page displays all completed live events. The drop down list can be used to sort the events by event date or event name. Navigation at the bottom of the Completed Events section allows scrolling between different pages of events.
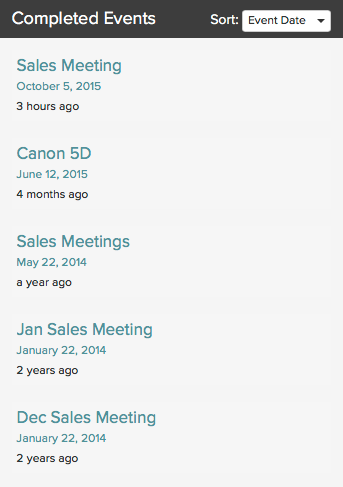
To view the details for a completed event, click on an event name.
Using multiple broadcasts per event
The Live module offers the ability to have multiple broadcasts per event. This feature allows you to:
- Retry an event if something goes wrong, without having to create an entirely new event.
- Setup an event and test it in advance before running the "real" event, again without having to create an entirely new event.
- Setup an event once and have recurring broadcasts within it.
Note: Using multiple broadcasts is only recommended when using a Smart Player. If you are publishing an event using a Brightcove Player, Brightcove recommends creating new events. In this case, using the reference id in place of the video ID in the publishing code will allow you to use the same publishing code for different events. For information on working with Reference IDs, see Using Reference IDs.

When the New Broadcast button is clicked, the Live module will generate a new Stream Name and Stream URL that must be entered into your encoder. The player publishing code for the event will not change.
Trimming and saving your live event
When you have stopped streaming your event, the Live module offers the ability to trim and save your live event to your Video Cloud account. Click the Create Clip button to open the trimming dialog. The Download Archive link allows you to download an archive of the event.
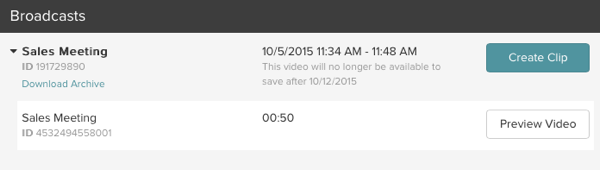
Note: The option to trim and save the live event to a separate video is only available for 7 days. After that, the Save button will not be available and there will be no way to archive the live event.
Note: When an event is trimmed and saved, it will not have a pushlished date. By deactivating and then activating the video, a published date will be assigned.
Note: Archived live streams will be removed from the CDN after 7 days. If you want to keep your live content for longer than a week, we recommend that you save the event as a video-on-demand asset in your Video Cloud account.
The trimming dialog allows you to trim the beginning and end of the live event. Drag the handles on the timeline to define which part of the event will be saved. The In and Out times can also be set by entering values in the text fields. Click Next when finished.
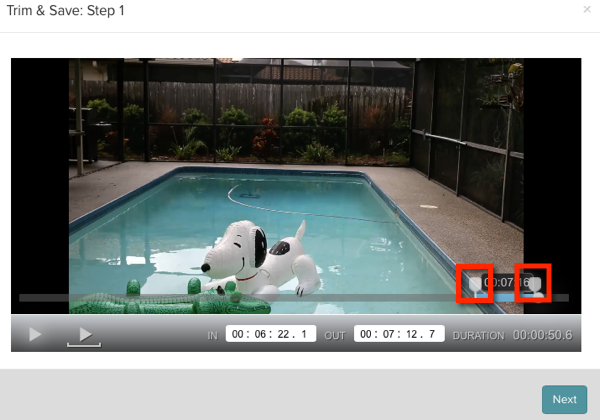
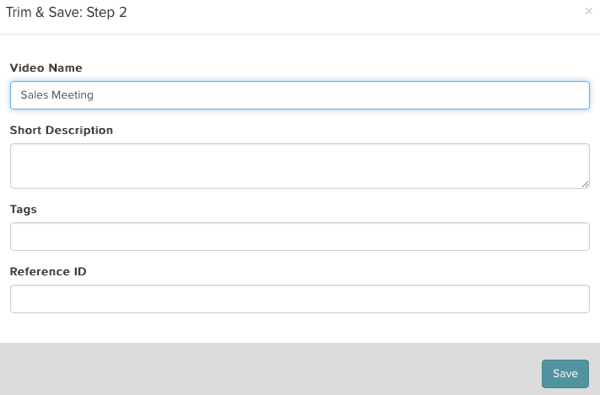
Enter a Video Name, Short Description, Tags and Reference ID and then click Save. These values will be associated with the trimmed asset in Video Cloud Studio. Click Save.
The video will be transcoded and saved into your Video Cloud account. When the transcoding is complete, expand the broadcast details and click on the Preview Video button to preview your live event in a player.

You can click the Create Clip button multiple times to create multiple clips of your broadcast. This allows you to trim and save as many times as you want for each broadcast, saving the clips as separate VOD assets in your media library.
Live event analytics
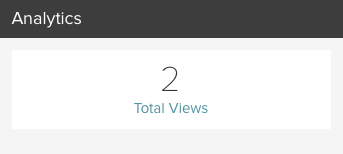
Once the live event has started, the Live module UI will display the total number of views for the event.
The Performance Report can be used to see the number of video views and viewed minutes for the live event. The Utilization Report can be used to see the live module hours used over time.
Troubleshooting live stream issues
If you are having issues with your encoder, for example, if you receive a "Failure to connect to primary server" error, make sure that port 1935 is open on your network. Zencoder uses RTMP to accept the input stream and it uses this port.
The Video Cloud Live module can be used to view stream information and can be helpful when troubleshooting live stream errors. Brightcove Support is also available to help you troubleshoot live stream issues.
For further help
If you need further help getting your live event to work, you can contact us. To make sure you get the fastest response possible, below is a list of what support will need to solve the problem.
- The specific symptoms the stream is having. For example, does it not play at all or does it stutter or freeze?
- Whether this stream worked correctly in the past
- The entry point URL you are using in your encoder
- The stream name and Zencoder Job ID
- The encoding software and hardware are you using
- The URL to the player to which you have published the live event
- The video ID of your live asset in Video Cloud Studio
- The results of a trace-route from your encoder to the publishing point host